


HD200
SelectSpray™ Turf Sprayer
- Industry-exclusive diaphragm or centrifugal pump
- Convenient wiring allows for easy sprayer removal
- Adjustable boom options for variety of conditions
- Bidirectional breakaway
Features
Industry-exclusive diaphragm or centrifugal pump options
 Diaphragm pump
  Pressure relief valve
 The John Deere SelectSpray™ Series are the only sprayers in the golf industry to offer the choice of centrifugal or diaphragm pump to meet specific applications or operator preference.
Diaphragm pump
If spraying turf paint, using a walking spray boom or just personal preference, the diaphragm pump is the option to choose. Diaphragm pumps provide lower flow rates, but can achieve much higher pressures compared to centrifugal pumps.
The 113.9-L/min (30.1 gpm) diaphragm pump provides plenty of flow for turf applications, but also can generate 290 psi (20 bar) of pressure. The pump is powered by a hydraulic motor and features a three-diaphragm configuration for excellent efficiency and smooth operation. The ability of this type of pump to handle thicker fluids, and its ability to run dry with no seals to fail, makes it a popular choice for tough spray solutions, such as turf paint.
Diaphragm pumps are positive displacement pumps, meaning that every revolution is going to pump fluid out of the pump outlet. As a result, a pressure relief valve is added to the main sprayer control valve assembly to protect the system if the system is dead-headed.
The relief valve pressure is adjustable up to 290 psi (20 bar), but should initially be set at 200 psi (13.8 bar). The spring-loaded relief valve opens a bypass line back to the tank when the system pressure reaches the relief pressure.
The pistons operate in an oil bath for long life and optimum lubrication. The diaphragms should be replaced annually or every 400 hours, whichever comes first. A standard suction strainer helps increase the life of the diaphragms by filtering debris out of the spray tank before it reaches the pump.
Centrifugal pump
 Stainless-steel centrifugal pump
  Standard air bleed line
 If looking for simplicity without sacrificing performance, the centrifugal pump line may be the right choice. Centrifugal pumps are reverse from diaphragm pumps in that they are higher-flow, lower-pressure pumps.
Flow rates can approach 397 L/min (105 gpm), while maximum pressure can reach approximately 95 psi (6.6 bar).
Centrifugal pumps for the SelectSpray Series are offered in two models: cast iron or stainless steel. Cast-iron pumps are the choice for general all-purpose spraying, whereas the stainless-steel upgrade is the choice for more corrosive chemicals, such as chelated iron.
The centrifugal pumps are powered by a hydraulic motor and come standard with a bleed line that purges air from the pump automatically, making priming the pump a breeze. Since a centrifugal pump will not pump fluid if the system is dead-headed, plumbing is simplified and no relief valve is required.
Lifeguard™ silicon-carbide seals allow both the cast-iron and stainless-steel centrifugal pumps to be intermittently run dry without failing the seal. Another added benefit of these durable pumps is that they require minimal maintenance—there are no diaphragms to replace and no oil to change.
No matter the application or personal preference, the John Deere SelectSpray Series offers a premium pump to meet the needs and demands of the operator's application.
NOTE: Centrifugal pumps are not recommended for turf paint spray applications.
Lifeguard is a trademark of Pentair Pump Group.
Choice of Gen2 TeeJet® automatic or manual application rate-control systems
The golf environment can be harsh, especially during spraying activities. The Gen2 TeeJet® controllers are designed to improve water resistance and offer better resistance to weather exposure. There are still two types of controllers to choose from, the automatic and manual models.
- The Gen2 controllers have improved water resistance characteristics and better resistance to inclement weather exposure.
- The Gen2s are designed to plug and play into existing wiring harness just as the previous controllers did.
- Programming, use, and functionality will be identical to the previous generation controllers.
 Gen2 TeeJet digital manual rate controller
 No matter which SelectSpray™ Series is chosen - the HD200 or its big brother, the HD300 - the choice of manual or automatic rate control is given.
Manual rate controller
If traditional pressure-based spraying is preferred, the manual rate controller is the right option. The control box mounts to a new ram mount in the glove box that provides improved positioning of the controller for optimum viewing by operators.
A simple liquid pressure gauge allows the operator to see the pressure being produced by the sprayer. Simply set the ground speed, adjust the system pressure, and get ready to spray.
All controls to operate the sprayer are located on the manual control box. Switches include a pressure increase/decrease switch, master switch, individual boom-control switches, boom lift/lower switches, and a foam marker switch.
The digital pressure sensor electronically relays the system pressure to the controller’s digital gauge. Simple, dependable and accurate with no hoses or lines to bleed or leak.
Gen2 TeeJet automatic rate controller
Gen2 TeeJet automatic rate controller  Automatic rate controller
  Digital display
 If the preference is for more technology in a rate controller that automatically regulates the target application rate with variations in speed, the automatic rate controller is the option of choice.
The automatic rate controller features all of the same switches as the manual controller, but also adds an auto/manual switch, so that operators can spray in automatic mode or, if preferred, manual mode.
The automatic rate controller also mounts in the same location as the manual controller and can be removed without tools for storage.
The system ties into the ProGator™ speed sensor, and adds a flow meter and digital pressure sensor to send a signal to the digital display to allow the operator to monitor speed, pressure, and application rate all on the same screen.
Units can be set in a variety of ways, including English, imperial, metric, and others, to allow users to read pressure, speed, and application rates in their preferred method.
Using the controller is easy. After turning on the controller, simply press the Pro button twice to enter the application setup screen. The application rate will be flashing. Any number that is flashing can be changed. Use the + and - buttons to set the application rate. Once the rate has been entered, press the Pro button and the pressure will flash.
The rest of the application setup mode is basically a calculator, which helps determine speed, pressure, and nozzle type. The calculator looks at the pressure, speed, and nozzle type to determine each variable's impact on the sprayer's ability to maintain the application rate.
As the application rate is entered into the controller, the pressure automatically changes as the application rate changes. For a given nozzle and speed, the pressure has to increase for a higher application rate, or decrease for a lower application rate.
If the user is not satisfied with the pressure required and wants a higher or lower pressure, use the + and - buttons while the pressure is flashing. The speed will change to show how much the operator must speed up or slow down to meet this pressure with the given nozzle.
Press the Pro button and use the + and - buttons to alter the speed and see its impact on the pressure required to achieve the target rate.
Automatic rate controller's nozzle display
 Nozzle display
 One of the most innovative aspects of the automatic rate controller is that it allows the user to input the color of nozzle being used. Nozzle colors are an international standard and are the same for each manufacturer for a given flow rate.
Suppose the user is not satisfied with the pressure and speed needed to achieve a target rate. The nozzle color can be changed in the controller to determine if there is a better fit. Hit enter one more time and the nozzle selector will flash. Use the + and - buttons to select the nozzle type. This helps the user to select the right nozzle for the right application, and minimize chances of misapplication.
Hold the Pro button for 2 seconds to 3 seconds, and the controller will go back to the operating mode. The only value stored is the application rate; the others go back to zero.
The calculator serves as a guide for what speed needs to be targeted to get the application rate for the nozzle and pressure the operator would like to spray.
The automatic rate controller is chock-full of other features, such as a tank volume indicator, warning alarms, test speed modes, and more. A comprehensive list of all the features is described in detail in the operator's manual.
Common wiring harness
What if the manual rate controller is purchased and later the operator decides they want the automatic rate controller? No problem. Due to a common wiring harness, one can easily switch from a manual controller to an automatic rate controller or vice versa by purchasing the kit for the one that is desired.
There is no wiring harness to change out; just add the components that go with the automatic or manual rate controller the operator wishes to install.
Get more out of the ProGator™ vehicle with optional storage stands
Who says sprayers are just for spraying? With the SelectSpray™ Series, the days of dedicated sprayers are a thing of the past.
Optional storage stands allow removal and installation of the sprayer in a matter of minutes. Spray in the morning, quickly change over to a cargo box for hauling some cargo, and then spray in the afternoon. It's really that simple, and no tools are needed to make the change.
For added convenience, the storage stands have caster wheels for easy removal of the sprayer. The operator can easily position the sprayer and experience the value of the caster wheels when re-installing the sprayer onto the ProGator vehicle.
No need to get the ProGator perfectly positioned under the sprayer; instead, use the caster wheels to get proper alignment.
The sprayer can be removed from the ProGator in a matter of minutes.
First, remove the control box from the mounting system and relocate the controller to the storage area on the back left-hand side of the sprayer. Leave the wiring harness connected to the controller.
 Sprayer resting on the front storage stands
  Rear jack stands
 Then use the hydraulics of the ProGator to raise the sprayer, install the front storage legs into their proper brackets, secure with the provided pin, and lower the sprayer onto the legs.
Then, install the rear jack stands using the pin chained to the jack. Rotate the handle to extend the jacks just far enough to relieve the pressure on the rear pivot pins.
 Removing the rear pivot pin
 Next, remove the rear pivot pins and the lift cylinder pin.
 Disconnect hydraulic lines
  Disconnect electrical connectors
 Disconnect the rear quick-connect hydraulic lines, and the three electrical connectors at the rear of the machine.
Make sure the drain line is clear of the ProGator frame.
 Driving ProGator away from sprayer
 Then drive the ProGator away from the sprayer or pull the sprayer away from the ProGator.
The sprayer has now been completely removed from the ProGator and is ready to be stored while not in use. Installation is just as quick and easy the next time the operator is ready to spray.
It's about versatility, getting more for the money, and the design of the SelectSpray Series that helps make the ProGator one of the most versatile heavy-duty utility vehicles in the marketplace today.
Convenient wiring harness allows for easy sprayer removal and component access
 Wiring harness components
 No matter which rate control system, manual or automatic, is selected, the wiring harnesses on the SelectSpray™ Series are identical. This allows for quick and easy changes when moving from an automatic rate controller to a manual rate controller or vice versa.
More importantly, the innovative electrical system design locates key components in one location on the machine. All fuses, relays, and lift/lower contactors are located in one convenient component box on the left-hand side of the machine. No tools are required to open the control box, leading to quick troubleshooting and component replacement.
When the sprayer is removed, the wiring harness remains with the sprayer—making changes between a sprayer and cargo box, or other attachments, a breeze. Only three connectors must be disconnected to remove the sprayer from the ProGator™ vehicle, greatly reducing removal and installation time.
Impact-resistant polyethylene spray tank features low center of gravity and excellent visibility
 HD200 SelectSpray Tank
  HD300 SelectSpray Tank
 Both sprayers in the SelectSpray™ Series line are equipped with impact-resistant polyethylene spray tanks. The tanks are styled for excellent visibility to the outer boom sections and a low center of gravity.
The tanks have a decal on the driver's side for reading the spray solution level, which is marked in graduated units. Product is loaded into the tank on the left-hand side of the machine.
A convenient basket strainer prevents large debris from entering the tank and can be easily removed without tools for cleaning.
The tank is equipped with a quick-fill feature, allowing the tank to be filled quickly anywhere it can be attached to a clean water source. This saves a lot of time by eliminating the task of traveling back to the original filling point every time the tank needs to be filled.
An anti-siphon feature on the quick-fill protects groundwater from unwanted chemicals.
For efficient pump flow and draining, the tank is sloped to a sump that provides sufficient volume to keep up with high-flow centrifugal pumps, and allows for proper and complete draining when emptying the tank.
A vent line is also provided as standard equipment that runs to the top of the tank to provide optimum priming for centrifugal pumps. The vent line also features a check valve that keeps chemical from exiting the tank.
Standard personal wash system on board
 Personal wash tank
 For added convenience, the SelectSpray™ Series features a standard personal wash tank. The tank should be filled with clean water only.
To open up flow for washing hands and other tasks, simply turn the handle to open up the valve.
Related Products
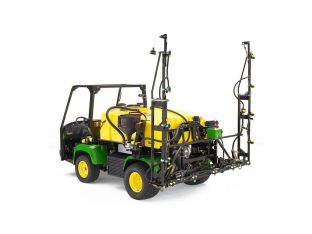
HD300
SelectSpray™ Turf Sprayer